Fluent Forms is my favorite form builder for WordPress and I’ve been using it on my websites for years (the Pro version, but everything below works with the free one too). One thing it still doesn’t have is a setting to track form submissions in Google Analytics, so you have to set it up yourself.
In this guide, I will show you step-by-step how to track Fluent Forms submissions in GA4 using Google Tag Manager. One tag tracks all the forms on your website, and you don’t have to change anything in the forms themselves.
Why my old method doesn’t work anymore
Back in 2021, I used to add a small <script> with a dataLayer.push() at the end of the form’s confirmation message (“Message to show” in the form settings). When the thank-you message showed up, the script ran and GTM could pick up the event. You’ll still find this method in many tutorials.
I tested it again on Fluent Forms 6.2.17 and it’s now broken. The plugin sanitizes the confirmation message, so the <script> tags are removed and the event is never pushed. Even worse, the code between the tags stays there, and your visitors will see it as plain text right after they submit the form:
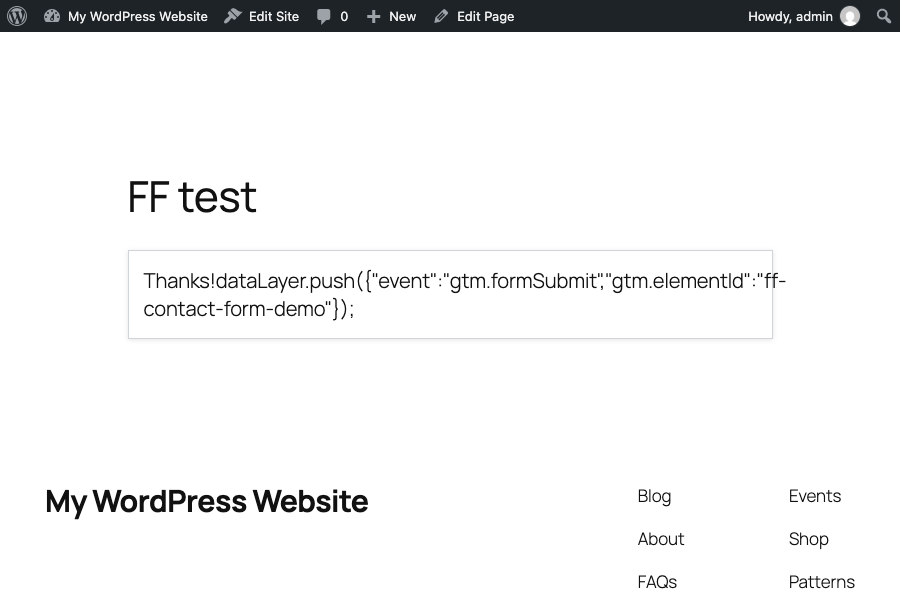
If you set up your tracking this way, open the confirmation settings of your forms and remove the script. Then follow the steps below.
How the new method works
Since version 6.1.5 (November 2025), Fluent Forms fires a browser event named fluentform_submission_success every time a form is submitted successfully. It also includes the ID of the form. We’ll listen for this event in GTM, push our own event into the dataLayer, and use it as a trigger for the GA4 event.
I like this approach much more than my old one. I only need one tag for all the Fluent Forms on my website, and new forms are tracked automatically. It only fires when the form is actually submitted, so a visitor who mistypes their email doesn’t count as a conversion. It also works no matter what the form does after the submission: show a message on the same page or redirect to a thank-you page. With a redirect, the event fires right before the browser leaves the page.
Here’s what we need to get started:
- Fluent Forms 6.1.5 or newer. If you’re on an older version, check the jQuery alternative at the end of this guide.
- Google Tag Manager installed on your website.
- Your GA4 Measurement ID (it looks like
G-XXXXXXXXXX). You can find it in GA4 at Admin → Data streams → your web stream.
1. Create a custom HTML tag that listens for form submissions
In Google Tag Manager, create a new Custom HTML tag and copy & paste the following code snippet:
<script>
  document.addEventListener('fluentform_submission_success', function (event) {
    window.dataLayer = window.dataLayer || [];
    window.dataLayer.push({
      event: 'fluentform_submit',
      form_id: String(event.detail.config.id)
    });
  });
</script>Code language: HTML, XML (xml)
Select the default trigger All Pages for this tag. The listener has to be ready before someone submits the form, and All Pages takes care of that. I named my tag cHTML - Fluent Forms listener, but you can freely change it.
Whenever a form is submitted successfully, this snippet pushes a custom event named fluentform_submit into the dataLayer, together with the ID of the form. It only sends the form ID, not what the visitor typed in the form. Please keep it that way and don’t add names, emails or phone numbers, as sending personal data to Google Analytics is against its terms.
2. Create a variable for the form ID
Next, create a new Data Layer Variable (Variables → User-Defined Variables → New) and set the Data Layer Variable Name to form_id. I named mine dlv - form_id.
The form ID is the number in the form’s shortcode. For example, my contact form’s shortcode is 3. You can also find it in the ID column at Fluent Forms → Forms.
3. Create a custom event trigger
Now that we send an event to the dataLayer, we need to use it as a trigger. Create a Custom Event trigger and set fluentform_submit as the event name.
- If you want to track all Fluent Forms on your website, leave it on All Custom Events.
- If you want to track only a specific form, select Some Custom Events and add the condition
dlv - form_idequals3. Remember to replace3with the ID of your form.
I named my trigger event - fluentform_submit.
4. Send the event to GA4
Create a new tag of the type Google Analytics → Google Analytics: GA4 Event and fill it in like this:
- Measurement ID: your
G-XXXXXXXXXXID. - Event name:
generate_lead. This is the event Google recommends for lead forms. I’m not usingform_submit, because GA4’s enhanced measurement already sends an event with that name and the two would get mixed up in your reports. - Event parameters: add
form_idwith the value{{dlv - form_id}}. - Trigger:
event - fluentform_submit, the one we created in the previous step.
This is also where using GTM pays off. You track the form submission once, and you can use the same trigger for any other tag: a Meta Pixel Lead event, a Google Ads conversion, LinkedIn, and so on.
5. Test the setup in Preview mode
Everything should be working properly, but I would never publish a GTM container without testing it first in Preview mode. To make sure only real submissions are tracked, we’ll submit the form twice.
- Click Preview in GTM and open the page with your form.
- Submit the form with an invalid email address. Fluent Forms will show an error, and you should not see a
fluentform_submitevent in Tag Assistant. - Fix the email and submit the form again. This time, you should see the
fluentform_submitevent in the left column of Tag Assistant, and your GA4 event tag under Tags Fired.
While Preview mode is on, you can also see the generate_lead event in GA4, at Admin → Data display → DebugView. If you got the same results, you can now publish your GTM container.
6. Mark the event as a key event in GA4
If you want to count form submissions as conversions, go to Admin → Data display → Events in GA4 and mark generate_lead as a key event (that’s GA4’s new name for conversions). The event will only show up in this list after GA4 has received it at least once.
To see which form each lead came from, register form_id as a custom dimension: Admin → Data display → Custom definitions → Create custom dimension, with the scope set to Event and the event parameter set to form_id. Keep in mind that GA4 only fills it in from the moment you create it, not for older events.
That’s it! You are now tracking Fluent Forms submissions in GA4.
Closing remarks
- Not using GTM? If GA4 is installed directly on your website (for example, with Site Kit), you can send the event straight to GA4. Add this snippet to the footer of your website (I recommend a code snippets plugin), then follow steps 5 and 6 the same way.
<script>
  document.addEventListener('fluentform_submission_success', function (event) {
    if (typeof gtag === 'function') {
      gtag('event', 'generate_lead', {
        form_id: String(event.detail.config.id)
      });
    }
  });
</script>Code language: HTML, XML (xml)- Using a version older than 6.1.5? The best solution is to update Fluent Forms, as the newer versions also include security fixes. If you can’t, the older versions fire the same event through jQuery only. Use the snippet below in step 1 instead, and set the tag’s trigger to DOM Ready (not All Pages), so jQuery is already loaded when it runs.
<script>
  jQuery(document.body).on('fluentform_submission_success', function (event, data) {
    window.dataLayer = window.dataLayer || [];
    window.dataLayer.push({
      event: 'fluentform_submit',
      form_id: String(data.config.id)
    });
  });
</script>Code language: HTML, XML (xml)- Payment forms that send the visitor to a payment step take a different path in the plugin’s code and may not fire this event. Test them in Preview mode, and track the purchase on the payment confirmation instead.
Disclosure: the Fluent Forms link is an affiliate link. If you buy through it, I earn a commission at no extra cost to you.